Summary
Calgary author Yvonne Kjorlien went from a single community-market table to a full Calgary Expo 2026 artist booth, and the printed materials made the jump possible. Her set included a banner, audiobook and ebook booklets, bookmarks, postcards, and posters, all built from one core Canva design. Resizing that design across every piece (instead of rebuilding each one from scratch) kept her branding consistent and her prep time manageable for a first-time expo table.
| Time to Read | ~7 minutes |
| What You'll Learn |
|
| Next Steps |
|
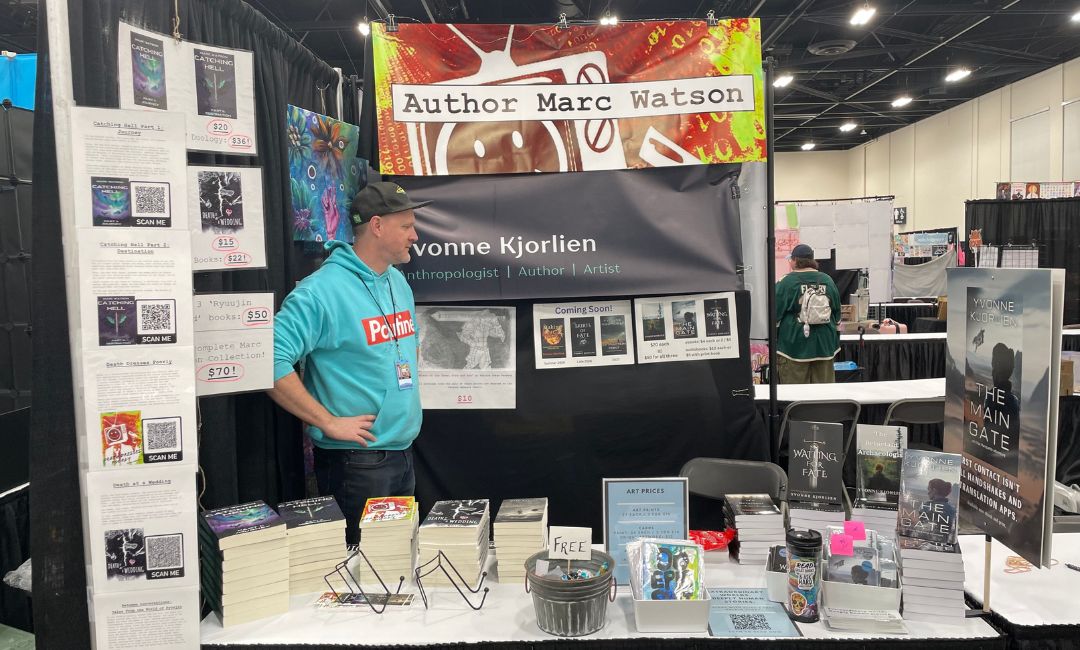
Setting up a table at a small community market is one thing. Standing behind a full booth at Calgary Expo, next to artists and vendors who've been doing this for years, is another. That's the jump Calgary author Yvonne Kjorlien made this year, and the biggest challenge wasn't her books. It was making her table look like it belonged there.
That's the problem most vendors run into eventually. You need a booth that looks put-together, actually tells people what you sell, and doesn't cost a fortune to produce, but that’s a lot to do, especially if you don’t know where to start. Yvonne solved it by building one core design in Canva and resizing it across every piece she needed for her table, from her backdrop banner down to her bookmarks. Little Rock® printed the full set for her, and we walked through exactly how she did it in this short video.
Looking Professional on a Vendor Budget
Most vendors selling at a market or expo are working with limited time, a limited budget, or both. Yvonne's situation is a pretty common one. She had books to sell, a table to fill, and no real design budget to hire someone to build five or six different print pieces from scratch.
Yvonne quickly realized that she needed a better approach, not a bigger budget. So instead of designing every banner, booklet, bookmark, postcard, and poster separately, she created one main design in Canva and then reused it across all of her marketing materials. A few adjustments for size, the same colours and fonts throughout, and suddenly the whole booth looked like it belonged together. It also saved her from starting every new file from the ground up.
What’s Actually in a Full Booth Set?
A booth setup usually needs more pieces than people expect going in. Here's what Yvonne's table included, and what each piece was doing for her:
| Piece | What It’s For |
| Banner | Draws attention from a distance and anchors the table |
| Audiobook & ebook booklets | Gives readers something to browse and take with them |
| Bookmarks | A cheap, branded giveaway that keeps her name in circulation |
| Postcards | Doubles as a mini flyer and a follow-up item after the expo |
| Posters | Fills out the visual space around the table |
Notice what's not on that list: the books themselves. Everything above is supporting material, the stuff that makes a table look like a real setup instead of a stack of products on a tablecloth. If you're planning something similar, our banners and banner stands are usually the first pieces to lock in, since they're the ones that have to work from across the room.
Related Reading
- How to Design a Pocket Folder in Canva: Step-By-Step
- How to Build a Brand Kit for Your Print Materials in Canva
- How to Resize Your Design in Canva
Design It Once, Resize It Everywhere in Canva
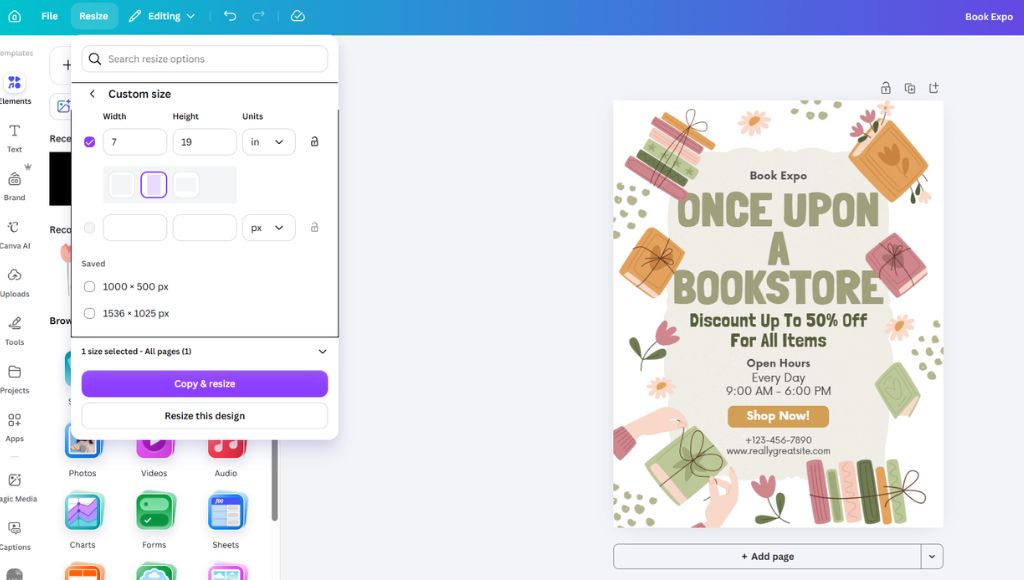
This is the part that's going to save you a lot of time. Once your core design is in place, Canva's Magic Switch tool lets you adapt it to any product size without having to rebuild from scratch.
Build the Core Artwork First
Start with your main design, whatever you're most likely to reuse the most elements from. For Yvonne, that was her banner artwork, since it had her branding, her author photo, and her book covers already laid out.
Resize with Magic Switch
From your design, open the resize menu and select Magic Switch. This feature maps your existing layout onto a new canvas size instead of leaving you with a blank page.
Type Each Product's Dimensions in Inches, not Pixels
Canva defaults to pixels for a lot of templates, but your print order needs inches. Type the actual finished size of each piece, in inches, before you resize. This one step avoids a lot of the "why is this the wrong size" problems people run into later.
Copy & Resize to Keep Your Original
Use Copy & Resize instead of resizing your original file. It creates a new version at the size you need while leaving your banner design unchanged. That way, if the layout of one print material needs a few extra adjustments, but others don’t, your original file is still there exactly as you left it.
Review and Fix Anything That Shifted
Magic Switch does a lot of the work for you, but it's still worth giving each resized design a quick review. Changing the canvas size can cause text to shift, images to crop differently, or logos to end up closer to the edge than you originally intended. Before exporting your file, be sure to check each design for:
- Text that's now overlapping or cut off
- Images cropped in a way that hides something important
- Logos or text sitting too close to the trim edge
A quick pass here takes a few minutes and saves you from a print run that doesn't look right.
Exporting Each Piece Print-Ready
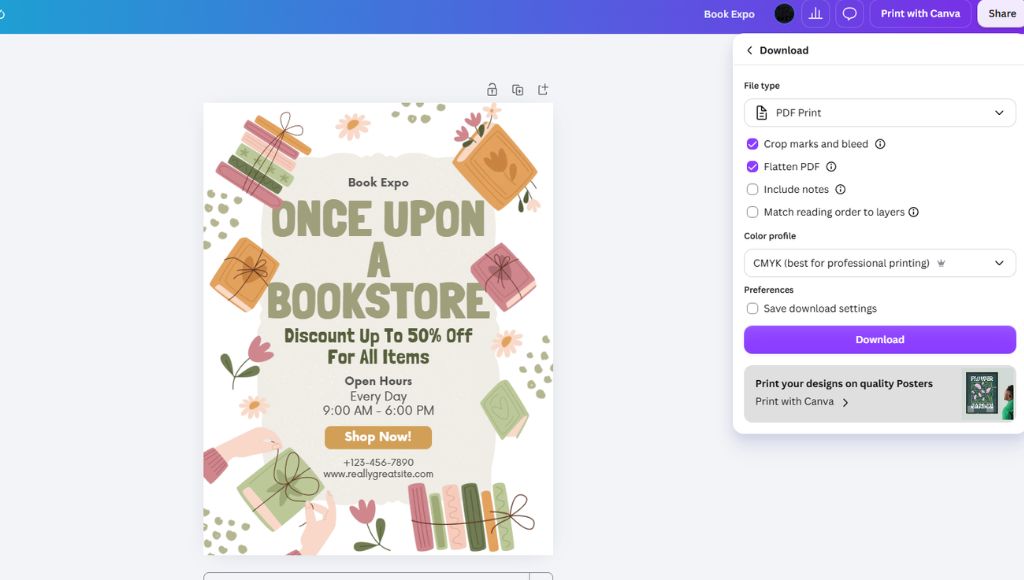
Once every piece is resized and cleaned up, the export step is what actually determines whether it prints the way it looks on your screen.
- Export as PDF Print, not standard PDF. This keeps your colours and resolution intact for the press.
- Check that your bleed and crop marks are turned on for anything that gets trimmed to size, like postcards, bookmarks, and posters.
- Flatten your file before exporting so text, images, and effects don't shift during processing.
- Confirm 300 DPI on any raster elements (photos, textures) so nothing prints blurry or pixelated.
This part takes a few extra minutes per piece, but it's the difference between a booth set that looks sharp in person and one that looks like it was printed at home.
The Extra Step That Made Her Table Stand Out
Along with the usual booth materials, Yvonne included one other item that many vendors often overlook. She didn’t just hand out bookmarks or postcards. Each visitor received a custom reader journal. It wasn’t a huge extra expense, but it gave people another reason to stop at her booth and browse her books, even if they weren't ready to buy one. Small things like that can make a bigger impression than adding another poster or other marketing material because they encourage people to pick something up, flip through it, and spend a little more time at your table.
If you're planning your own booth or market table, this is worth thinking about early. It doesn't need to be a journal. It just needs to be something small, on-brand, and worth picking up.
Planning Your Own Booth or Market Table
Whether you're getting ready for your first community market or a larger event like Calgary Expo, the approach is the same. Start with one strong design in Canva, adapt it for each printed piece you need, then order everything together so it has a consistent look. With no order minimums and Canada-wide shipping, Little Rock® makes it easy to print your booth materials all at once instead of one piece at a time. Browse our posters and postcards product pages for sizing and paper options, or get in touch if you'd like help planning your booth before your next event.
If you were at the Calgary Expo and saw Yvonne’s booth, we’d love to see any pictures you may have taken. Post them to social media and tag us, Calgary Expo, and Yvonne (with her permission, of course).