Summary
Graduation announcements are mailed to family and friends before the ceremony; programs are handed out at the event itself. Both need to look polished and print correctly, but they're designed very differently. Announcements are typically single cards with a photo and key details, while programs are multi-page documents with dense content that has to stay readable. Canva handles both well, as long as you set up your canvas correctly and export with the right settings
| Time to Read | ~8 minutes |
| What You'll Learn |
|
| Next Steps |
|
Graduation season means two separate design projects that most people don't realize are quite different. The announcement goes in the mail weeks before the big day, so it needs to make an impression in someone's hands. The ceremony program gets handed out at the event, so it needs to be easy to read quickly and hold a lot of information without feeling overwhelming.
Ready to get your announcements and programs printed in time for graduation? Order all of your graduation and other print essentials from Little Rock Printing®.
Designing Graduation Announcements
Step 1: Choose Your Announcement Format
Before you open Canva, decide what format you're working with. The three main options for mailed announcements are flat cards, folded cards, and postcards.
| Format | Best For | Trade-Offs |
| Flat Card | Clean, modern look; front/back design | Requires an envelope; slightly higher postage |
| Folded Card | More content space; feels premium | Costs more to print; bulkier to mail out |
| Postcard | Budget-friendly; easy to mail | Less space; no envelope. |
Postcards are the most economical option if you're sending a large volume. Folded cards give you the most design real estate and feel more like a keepsake. Flat cards are a solid middle ground.
Step 2: Set Up Your Canvas in Canva
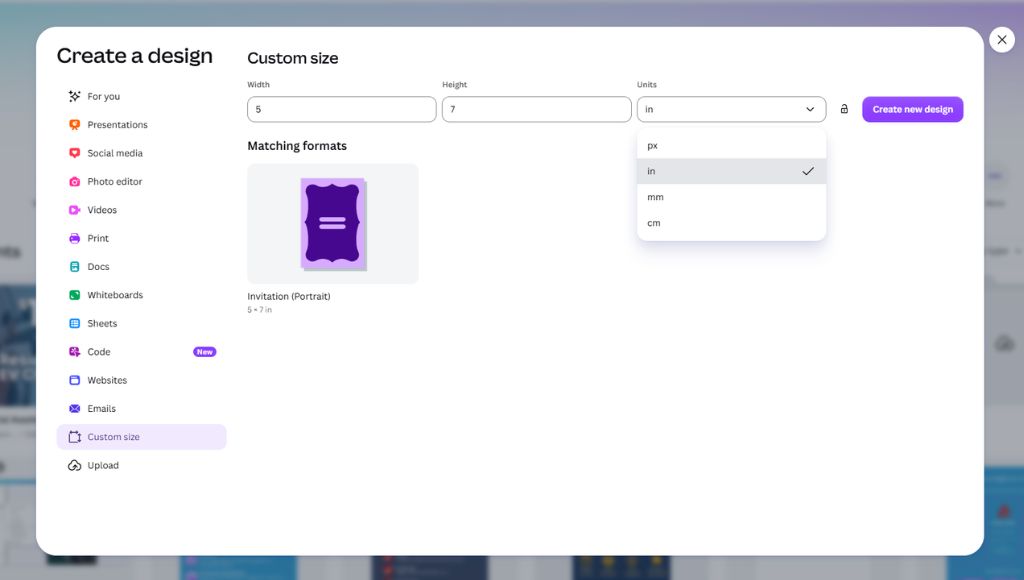
Once you know your format, set up your canvas with the correct dimensions. In Canva, go to Create a Design > Custom Size and enter your dimensions. Common sizes are:
- Flat card: 5" x 7" (or 4" x 6" for a smaller format)
- Folded card: 5" x 7" folded (set up as 10" x 7" to design both panels side by side, or as two separate pages)
- Postcard: 4" x 6" or 5.5" x 4.25"
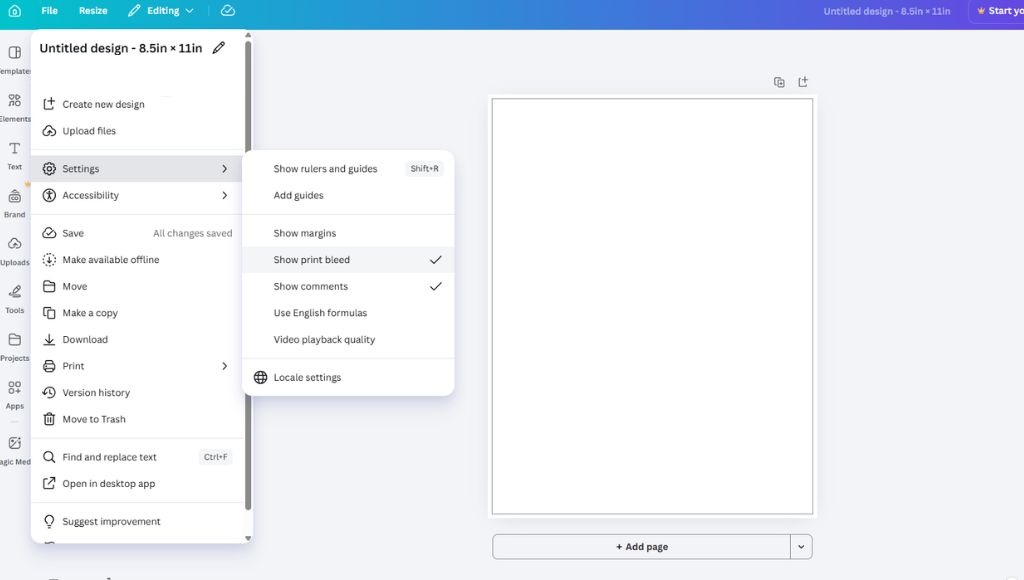
For print, you'll want to add 0.125" bleed on all sides. In Canva Pro, go to File > Settings and turn on Show print bleed. Keep all important text and graphics at least 0.125" inside the edge to avoid anything getting cut off during trimming.
Step 3: Design the Front

The front of your announcement is doing the most work. It needs to communicate who, what, and when at a glance while still looking celebratory.
What to include:
- Graduate's full name (make this the visual anchor of the design)
- Graduation year
- School or program name
- A photo of the graduate
For the photo, you'll get the best results if you use a clean, well-lit image with a simple background. If the original photo is busy, Canva's Background Remover tool (available in Canva Pro under Edit Photo) lets you quickly isolate the subject. You can then place them on a solid colour, gradient, or branded background that matches your design. If you want more control over the result, Adobe Firefly can handle more complex backgrounds and lighting adjustments.
| 🎓Layout tip: Anchor the graduate's name at either the top or bottom, place the photo as the dominant element, and keep supporting text (year, school) small and secondary. Avoid centering absolutely everything, because it tends to make cards feel flat. |
Step 4: Design the Back or Interior
The back of a flat card, or the interior of a folded card, is where the practical details and the personal message live.
What to include:
- Ceremony date, time, and venue
- Reception details (if applicable)
- A short message from the graduate or family
- Optional: contact info or social handle
The tone here should feel warm but still be easy to scan. Use a readable font at a comfortable size (14pt minimum for body text), and don't try to fill every inch of space.
Pro Tip: White space makes the details easier to take in.
If writing the personal message is where you're getting stuck, you can always turn to AI. Try prompting ChatGPT, Claude, or another AI tool with something like: “Write a short, warm graduation announcement message from a family. The graduate is finishing a nursing degree. Keep it under 60 words and avoid sounding formal.” Use it as a starting draft and personalize from there.
Designing the Ceremony Program
Step 1: Plan Your Program Structure First
Don't open Canva until you know what's going in the program. Trying to design and write at the same time almost always results in content that doesn't fit the layout you've built.
Typical program sections:
- Cover (ceremony title, date, venue, school/organization name)
- Order of ceremony
- Graduate listing
- Speaker bios
- Acknowledgements
Write out all your content in a plain document first and note roughly how much space each section needs. A long graduate listing will need more pages than a small cohort. Speaker bios vary a lot in length. Knowing this ahead of time prevents you from having to redo your layout halfway through.
Step 2: Set Up Your Canvas for a Multi-Page Program
Ceremony programs are usually printed as booklets (folded and stapled) or as single-fold inserts. Common sizes are:
- Booklet: 8.5" x 11" pages (printed and folded to 5.5" x 8.5")
- Single-fold: 5.5" x 8.5" flat, folded in half
In Canva, set your page size to match your flat sheet dimensions before folding. For a standard booklet, that's 8.5" x 11".
Key setup steps:
- Add 0.125" bleed on all sides.
- Add a binding margin (gutter) of at least 0.375" on the inner edge of each page so text doesn't disappear into the fold.
- Set up a layout grid using Canva's rulers and guides (View > Rulers and Guides) to keep your margins uniform across all pages.
If your program is more than four pages, use Canva's Pages panel to manage each page individually and apply a consistent background or header style across the entire document.
Step 3: Design the Cover
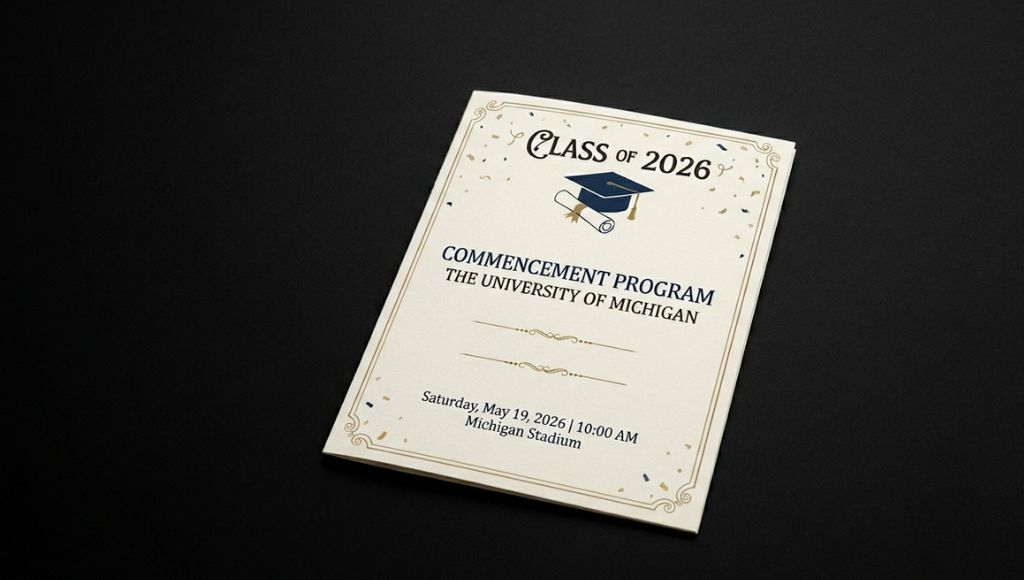
The cover sets the tone for the whole event. Keep it formal but not stiff.
What to include:
- School or organization name and logo
- Ceremony title (e.g., "Graduation Ceremony 2026")
- Date and venue
- Optional: a simple graphic element or photo
A good rule of thumb is to stick to two or three fonts at most, and make sure the hierarchy is clear. The ceremony title should be the largest element, then the school name, and finally, the details. If you're using the school's official colours and logo, check that the logo file is high-resolution (300 DPI or higher) before uploading it to Canva.
Step 4: Design the Interior Pages
Interior pages in a ceremony program deal with a lot of text, often in tight spaces. The goal is readability, not decoration.
Tips for interior pages:
- Graduate listings: Use a clean serif or sans-serif font at 10-12pt. Depending on the number of graduates, you might want to make it a two-column layout to fit more names without crowding them. Adding a small amount of leading between each name prevents the list from feeling like one massive wall of text.
- Section headers: Use a slightly larger font size or a different weight to signal transitions between sections (e.g., "Order of Ceremony" to "Graduate Listing"). You don't need heavy graphic elements here.
- Speaker bios: Set speaker bios at a comfortable body text size (12-14pt works well) with clear spacing between each. If bios run long, a horizontal rule or line between entries helps separate them visually.
- Consistent margins: Keep the same margin width on every page. Even a small inconsistency is noticeable when the program is held open.
Export Both Files for Print
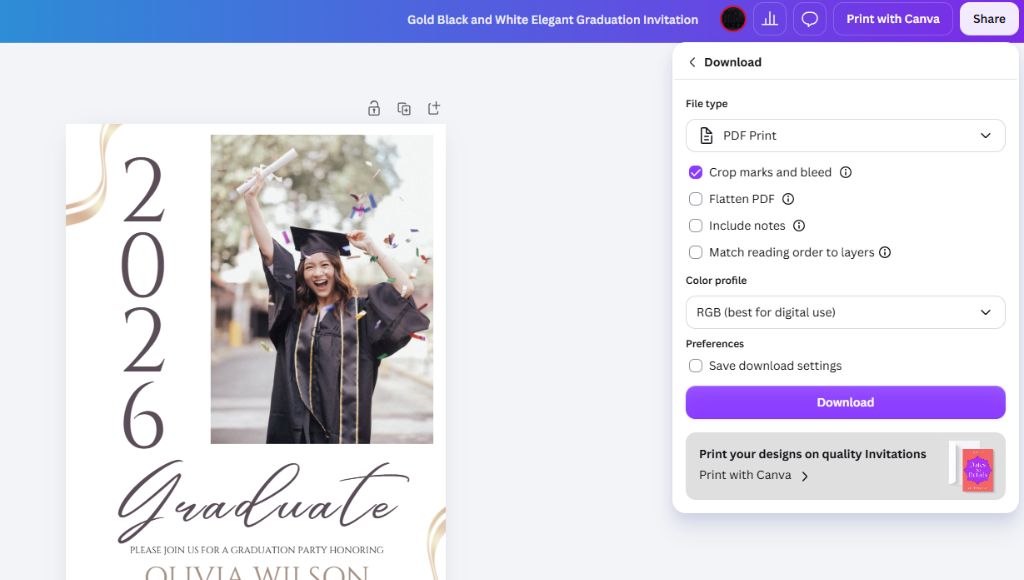
When both designs are ready, export them as separate print-ready PDFs.
In Canva, go to Share > Download and select:
- File type: PDF Print
- Check "Crop marks and bleed" so your printer has guides for trimming
- Colour profile: Canva exports in RGB by default. If your printer requires CMYK files, confirm with them in advance. Little Rock Printing® can advise on file requirements when you place your order.
Pre-export checklist:
- All text is inside the safe margin zone
- Bleed is enabled and extends to the edge of the canvas
- No low-resolution images (check that photos look sharp at full size)
- Both files (announcement and program) are exported separately and clearly named
Order Your Graduation Announcements and Programs
Once your files are ready, Little Rock Printing® can handle the rest. We print graduation announcements in flat card, folded card, and postcard formats, and we offer booklet printing for ceremony programs in a range of sizes and binding options. If you have questions about file setup before you export, reach out, and we'll make sure your files are print-ready before you place your order.