
FAQ’s &
CUSTOMER FEEDBACK FORM
The Most Common Questions People Ask Us
Do you do graphic design?
We don’t offer in-house graphic design services most customers find it very easy to use Canva to create Print Ready Files. Check out our video to see how easy it is to make print files and work with thousands of templates.

How to use Canva to design and create your Print Ready PDF files?
To design using Canva, follow these steps:
1. Sign up for a Canva account and log in.
2. Choose a template from the list of available templates. If you are designing to a specific measurement, please be sure to start by setting your size to the specific height and width you are planning to print at – be sure to set this to inchies as the default measurement in Canva is pixels (px).
3. Customize the design to your liking by adding your own text, images, colors, and logos. You can also choose from a variety of design elements like shapes, lines, and icons.
4. Adjust the size and layout of your design as needed to fit the dimensions of your design.
5. Preview your design to see how it will look when printed.
6. Download your design in the Print PDF format.
7. Print your business cards on high-quality card stock or have them professionally printed. The most common paper type for Business Cards is the 15PT Cover.
That’s it! With Canva, you can create professional-looking business cards in just a few minutes.
How do I order proofs?

Since we have no minimum order size, getting proofs is easy—just place a regular order for a single product and use the coupon code FREEPROOF to discount the charges to $0.00
How do I combine multiple designs in the same order?

Little Rock Printing™ lets you combine quantities within the same order for a better price, as long as:
- Your designs are all the same size
- Your designs use the same type of paper or stock
- You order all your designs at the same time (for example, an order of 1000 units for 4 designs with 250 copies for each).
To combine multiple orders, simply send the files and quantity breakdown to [email protected]
Can I order any quantity for my design?
That’s right; Little Rock Printing™ has low order minimums—which means you can place an order as small as a single copy for any of our products. If you don’t see the quantity you want listed on the product page, select “Custom Quantity” in the bottom left corner and fill in the amount you want to see the price break.
Can I set up an account with you?
We’re always happy to set up accounts for new or returning customers. You can either pay as you go online, pay on pickup, or have us keep a card on file, you can also apply for credit by requesting a credit application from [email protected]
You can fill out the New Account Form Online
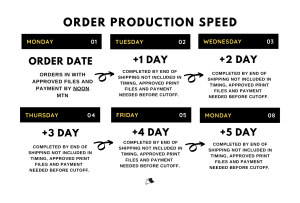
What are the cutoff times for each production speed?
Our daily cutoff time is listed on each product page. Orders, along with the print ready PDF files need to be recieved before the cutoff time. We can sometimes still get teh job done outside of this cutoff, to check please contact us directly to see if this is possible and depending on that days workload we can work with you to try and get your orer done for when you need it.
Why are PDF's the best file to print from?
PDF (Portable Document Format) files are widely used for printing because they offer several advantages over other file formats such as PNG and JPEG.
1. Compatibility: PDF files are compatible with a wide range of devices and printers, ensuring that the document will look the same no matter where it is printed.
2. Preserves formatting: PDFs preserve the original formatting of the document, including font types, images, graphics, and layout, which makes it ideal for printing complex documents with multiple elements.
3. Supports vector graphics: PDF files support vector graphics, which are resolution-independent, allowing the document to be printed at any size without losing quality.
4. Smaller file size: PDF files can be optimized for smaller file size while preserving high image quality, making it easier to share and transfer large documents.
On the other hand, PNG and JPEG files are primarily used for digital images and photographs. They do not support vector graphics and may not preserve the original formatting of the document when printed, especially for complex documents. Additionally, JPEG files are lossy, which means that every time the file is saved, some quality is lost, making it less suitable for printing purposes.
In conclusion, PDF files are the best for printing because of their compatibility, ability to preserve formatting, support for vector graphics, and smaller file size.
What does Vector Graphics mean?
Vector graphics are a type of digital image that is made up of paths, rather than pixels. They are defined mathematically and are scalable to any size without losing quality or clarity, which makes them ideal for printing. When preparing files for printing, vector graphics are often used to create logos, illustrations, and other types of graphics that need to maintain their sharpness and detail at different sizes. Unlike raster images, which are made up of pixels, vector graphics can be edited and manipulated without losing quality, making them a popular choice for graphic designers and printers
How to Export a File with Bleed from Adobe Indesign
How to Export a File with Bleed from Adobe Photoshop?
Understanding Bleed and Margins
What is a Print Ready PDF?
How to export your PDF with outlined fonts in Illustrator?
How to view Margins and Bleed in Canva?
How to change your file size in Canva?
Whats the Difference between HEX Color Codes and CMYK Color Pantones?
Whats the Difference between HEX Color Codes and CMYK Color Pantones?

How to Export High-Quality PDFs for Printing from Canva
Title: How to Export High-Quality PDFs for Printing from Canva
Introduction: Exporting a high-quality PDF for printing from Canva ensures that your design appears with accurate colors and sharp details when printed. This guide will walk you through the process of exporting your file as a high-quality PDF for printing from Canva.
Step 1: Prepare your design in Canva
- Open your design in Canva.
- Ensure that your design uses the appropriate dimensions and resolution for your print project. A good rule of thumb is to use a resolution of 300 PPI (pixels per inch) for printing.
Step 2: Export your design as a PDF
- In the top right corner, click the “Download” button.
- In the “File type” dropdown menu, select “PDF Print” as the file format. This format is designed specifically for high-quality printing.
Step 3: Configure PDF settings
- Under “Quality and File Size”, choose “High” to ensure the best possible resolution and image quality.
- If your design has a bleed or requires crop marks, check the “Crop marks and bleed” option to include these in your exported file. This is important for professional printing, as it helps the printer accurately trim your design to size.
- (Optional) If you have multiple pages in your design and you want to download them as individual files, check the “Download as separate pages” option.
Step 4: Download and review your PDF
- Click the “Download” button to export your high-quality PDF for printing.
- Open the exported PDF in Adobe Acrobat or another PDF viewer to ensure that your design appears correctly and that all required marks and bleeds are present.
Conclusion: By following these steps, you can successfully export a high-quality PDF for printing from Canva. This will ensure that your design prints with the best possible resolution, accurate colors, and sharp details.
What kind of file should I send?
Best files for printing
In general, the following guidelines can help ensure that your file is print-ready:
1. File format: For best results, it is recommended to send your file in to us as a Portable Document Format (.pdf) format. This format preserve vector graphics and maintain image quality when scaling.
2. Resolution: The resolution of your file should be at least 300 dpi (dots per inch) for the best printing quality. Higher resolutions will result in better image clarity, but may also result in larger file sizes.
3. Color mode: Make sure to use the appropriate color mode for your printing needs. If your file contains photos or images, use the CMYK color mode, which is used in four-color printing. If your file contains specific colors make sure to profile your colors a PMS Pantone spot colors.
4. Bleed: If your design extends to the edge of the paper, it is important to include a bleed area in your file. The bleed area is an extra margin of about 1/8 inch around the edge of the page that will be trimmed off during the printing process. This ensures that there are no white margins around the edge of your printed design.
5. Margins: Make sure to include appropriate margins in your design to ensure that important elements are not trimmed off during the printing process.
6. Fonts: Embed all fonts used in your file or convert them to outlines to avoid font substitution or compatibility issues.
If you are designing in Canva or Adobe Illustrator see the below links for how to export your files as PDF’s
How do I send files?
You can:
- Upload your file when you place your order in your CART
- Use our file uploader (click here)
- Send us your own file transfer link (via WeTransfer, Dropbox, etc.)
Files are not required with your order but it is best practice to attach the PDF print files with your order. If you send the files seperately please be sure to include your order number in the file transfer.
We ask that you send files with each order to ensure we are working with the most current and up to date print files.

How to Export High-Quality PDFs for Printing from Adobe Illustrator
Title: How to Export High-Quality PDFs for Printing from Adobe Illustrator
Introduction: Exporting a high-quality PDF for printing from Adobe Illustrator is crucial for maintaining the sharpness and accurate colors of your vector artwork. This guide will walk you through the process of exporting your file as a high-quality PDF for printing from Illustrator.
Step 1: Prepare your artwork in Illustrator
- Open your file in Adobe Illustrator.
- Ensure that your document is in CMYK color mode (File > Document Color Mode > CMYK Color).
- Confirm that your document resolution is set to 300 PPI (Effect > Document Raster Effects Settings > Resolution).
Step 2: Save your file as a PDF
- Go to File > Save As.
- Choose “Adobe PDF (pdf)” from the Format dropdown menu.
- Name your file and choose a location to save it. Click “Save”.
Step 3: Configure PDF settings
- In the “Save Adobe PDF” dialog box, click on the “Adobe PDF Preset” dropdown menu and select “High Quality Print”. This preset is designed specifically for high-quality printing.
- On the left sidebar, click on “Compression”. Under “Image Compression”, select “JPEG” and set the “Image Quality” to “Maximum”.
- On the left sidebar, click on “Output”. Under “Color Conversion”, choose “Convert to Destination” and select the appropriate color profile for your printer (usually “U.S. Web Coated (SWOP) v2”).
- Under “Destination”, make sure “Preserve Numbers” is selected in the “Profile Inclusion Policy” dropdown menu.
- On the left sidebar, click on “Marks and Bleeds”. If your artwork has bleed or requires crop marks, check “Trim Marks” under “Printer’s Marks” and enter the desired bleed values under “Bleed and Slug”.
Step 4: Save and review your PDF
- Click “Save PDF” to export your high-quality PDF for printing.
- Open the exported PDF in Adobe Acrobat or another PDF viewer to ensure that your artwork appears correctly and that all required marks and bleeds are present.
Conclusion: By following these steps, you can successfully export a high-quality PDF for printing from Adobe Illustrator. This will ensure that your vector artwork prints with the best possible resolution, accurate colors, and sharp details.
How to Export High-Quality PDFs for Printing from Photoshop
Title: How to Export High-Quality PDFs for Printing from Photoshop
Introduction: Exporting a high-quality PDF for printing from Adobe Photoshop ensures that your artwork is displayed at the best possible resolution, with accurate colors and sharp details. This guide will walk you through the process of exporting your file as a high-quality PDF for printing from Photoshop.
Step 1: Prepare your artwork in Photoshop
- Open your file in Adobe Photoshop.
- Ensure that your document is in CMYK color mode (Image > Mode > CMYK Color).
- Confirm that your document resolution is set to 300 DPI (Image > Image Size > Resolution).
Step 2: Save your file as a PDF
- Go to File > Save As.
- Choose “Photoshop PDF” from the Format dropdown menu.
- Name your file and choose a location to save it. Click “Save”.
Step 3: Configure PDF settings
- In the “Save Adobe PDF” dialog box, click on the “Adobe PDF Preset” dropdown menu and select “High Quality Print”. This preset is designed specifically for high-quality printing.
- On the left sidebar, click on “Compression”. Under “Image Compression”, select “JPEG” and set the “Image Quality” to “Maximum”.
- On the left sidebar, click on “Output”. Under “Color Conversion”, choose “Convert to Destination” and select the appropriate color profile for your printer (usually “U.S. Web Coated (SWOP) v2”).
- Under “Destination”, make sure “Preserve Numbers” is selected in the “Profile Inclusion Policy” dropdown menu.
- On the left sidebar, click on “Marks and Bleeds”. If your artwork has bleed or requires crop marks, check “Trim Marks” under “Printer’s Marks” and enter the desired bleed values under “Bleed and Slug”.
Step 4: Save and review your PDF
- Click “Save PDF” to export your high-quality PDF for printing.
- Open the exported PDF in Adobe Acrobat or another PDF viewer to ensure that your artwork appears correctly and that all required marks and bleeds are present.
Conclusion: By following these steps, you can successfully export a high-quality PDF for printing from Photoshop. This will ensure that your artwork prints with the best possible resolution, accurate colors, and sharp details.
What's the difference between CMYK and RGB?
CMYK (Cyan, Magenta, Yellow, and Black) and RGB (Red, Green, Blue) are color models used in printing and digital displays respectively.
1. CMYK: CMYK is a subtractive color model used in printing. It works by absorbing light, which is then reflected back to the eye, creating the perception of color. The colors produced by the CMYK model are created by layering different combinations of cyan, magenta, yellow, and black inks. The use of black (K) helps to create deep, rich shades and improve image quality.
2. RGB: RGB is an additive color model used in digital displays such as monitors, televisions, and smartphones. It works by emitting light and combining different intensities of red, green, and blue to create the perception of different colors. RGB colors are brighter and more vivid than those produced by the CMYK model, which is why RGB is the preferred choice for electronic displays.
In summary, CMYK is used for printing, while RGB is used for electronic displays. When designing for both print and digital use, it’s important to understand the difference between these color models and adjust your design accordingly.
Can you ship my product?
Almost everything we make can be shipped anywhere in Canada (except for Life Sized Cutouts) which are only available for pickup. We calculate shipping charges at checkout, based on your address and chosen delivery type:
How long does it take to print?
Most of our products come with options to have your order ready in anywhere from 1-5 business days. Please provide print-ready PDF files for your designs so we can focus on making each order perfectly and delivering by the deadline.
My finished size can’t be entered on the product page—can I still order it online?
No problem! Start by choosing your product and selecting the closest size available online (for example, if you want 3.16” x 4.64” labels, select 3.25 x 4.5”). Then enter the exact size in the “Special Notes” section before completing your order.
How do I know what kind of paper to use?
We recommend that you order a Free Paper Sample Kit, or Visit Our Paper Library to learn more about our many paper options.
You can also order a FREE PROOF anytime by using the FREEPROOF coupon on a sample order.

CUSTOMER FEEDBACK FORM
Feedback Form
We are always looking to improve, let us know why you choose Little Rock Printing™ for printing, and let us know what we can do better to improve. Also, if you have photos of your printed product we would love to see your product in action with your brand!